Home labs seem to be a hot topic recently so I thought I would share my setup and experience. Many people design their home labs in different ways. Some like to use server level equipment that resides on the HCL while others like myself prefer to keep a little change in the bank and go for more of a whitebox, desktop setup. The challenge with a whitebox setup is ensuring all of your components are going to work as expected with minimal fuss. Another difference in my setup is what I call the waterfall effect. In order to maximize the investment in multiple systems, I pass along the hardware down the chain. So what was my previous host, now becomes my desktop and my desktop moves down the line (whether it be used for a NAS, kids, etc). This allows me to refresh the host and cascade the hardware down the line.
At its roots, my home lab consists of a standalone host running ESXi with 32GB of RAM and my desktop running Workstation with 16GB of RAM. This allows me to do a bunch of testing, learning, playing around and of course have a minecraft server always available for the kids. The increase in RAM was the largest improvement as my previous setup was only 16/8GB. The second greatest increase was the addition of SSDs into the mix – enough can not be said for the performance increase SSDs bring to the table, especially in a home lab as disk I/O is most likely going to be your largest bottleneck.
Here is a list of the major items I built the latest host from:
- Motherboard – ASUS Q87M-E
- CPU – Intel Core i7-4770S
- RAM – (x4) Kingston 8GB Desktop Memory Model KVR16N11/8
Current pricing (as of 1/31/14) shows to be around $840 though at the time of purchase at the first of the year, came in around $680 after discounts.
Additional components include:
- Dual Port Gigabit Realtec 8168 based PCIe NIC
- Samsung 840 256GB SSD
- (x2) Western Digital 1TB HDD
Knowing the CPU will someday be in my desktop, I went with the latest Haswell chip – Intel’s i7-4770S. The ‘S’ version runs a bit lower wattage which will help the electric bills as the system is on 24/7. I’ve used a ton of RAM in the past from many different vendors, Kingston always seems to have a reliable product and a good return policy if needed. The mobo was probably the one piece I stewed on for a few days before ordering. I would have preferred a few additional PCIe ports though I honestly do not install many addon cards anymore aside from a single dual-NIC adapter and as I currently use the onboard graphics from the CPU, this leaves me two slots to work with.
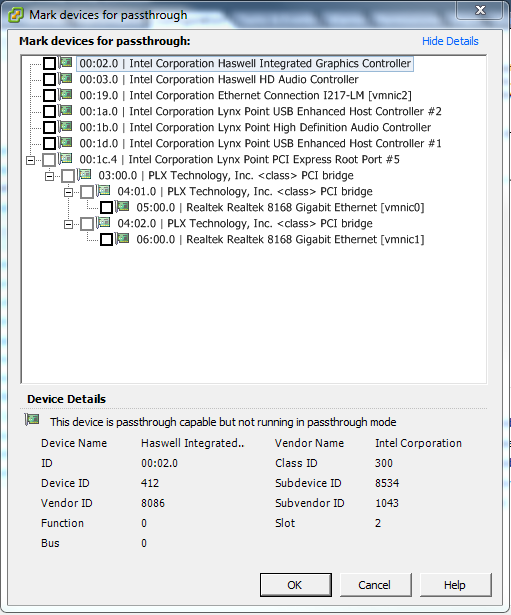
As mentioned previously, building an ESXi whitebox can be a bit of a challenge and a trade-off between price and functionality. The i7-4770 does support VT-x as well as VT-d which allows for hardware pass-through though the mobo was not quite so co-operative. The onboard Lynx SATA disk controller does not support DirectPath I/O which was not a deal breaker for me. The onboard Intel I217-V NIC was also not detected by ESXi, though can easily be resolved via a custom driver as shown here. Aside from that, everything works extremely well. Below is a shot of the DirectPath I/O config from ESXi for those that are curious.
Hi!
I bought the ASUS Q87M-E, and I can’t seem to get vga passthrough going. What settings did you have to change in bios?
Thanks!
-Sven
Hi Sven,
I don’t recall doing anything special with the BIOS. Though you see the adapter available in the list, I did not go as far as enabling it for passthrough.
Best of luck!
–shawn